


Traeger Turkey Brining

Want to avoid a dry, bland bird? Then you should try brining your turkey before throwing it on the Traeger. We’ll discuss brining, different ways to brine your bird, and offer some tips that will help you cook your best turkey yet.
Essentially, brining your turkey infuses it with salt, which helps it retain moisture during cooking and also seasons the bird from within for maximum flavor. It’s the easiest way to ensure a juicy, flavorful turkey that’s worthy of headlining your feast.
Wet Brine Vs. Dry Brine
There are two basic methods for brining—wet brining and dry brining. Wet brining involves soaking the turkey in a salt and water solution, while dry brining simply calls for applying a salt rub to the bird without any liquid. In both cases, salt is the essential requirement, but typically people add other flavorings including spices, herbs, citrus, sugar, and more to make the turkey even tastier. Scroll down to see some of our favorite ways to add extra flavor to our brines.

Brining a Turkey to Infuse Moisture and Flavor
The secret to perfect poultry lies not just in how it’s cooked, but how it’s prepared. A dry rub will usually suffice for pork and beef, but when it comes to poultry, sometimes it pays to think beyond the surface. By using a simple turkey brine you’ll keep the skin crisp and the meat tender, juicy and flavorful.
What Is a Brine?
Simply put, a turkey brine is what locks flavor and moisture into the meat before you cook it. A basic turkey brine would just be water and salt, but you can infuse extra flavor by adding other ingredients
Why You Should Brine Your Turkey
Brining your turkey is a crucial step in the cooking process. A brine achieves two things that are key to making the most of your turkey – moisture and flavor.
The salt concentration in water triggers a chemical reaction so that the liquid will slowly enter the cells of turkey meat, bringing all the added flavor from the herbs in with it. Once the salt has entered the meat, it retains moisture and flavor throughout the cooking process. The longer the bird sits in the brine, the more flavorful your turkey will be – up to a point. Leaving it too long will make it overly salty and negatively affect the texture. Never brine your bird for more than 24 hours.
How Long To Brine a Turkey
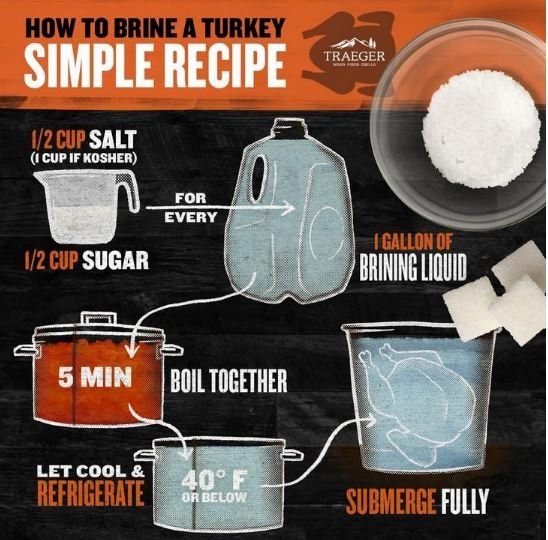
The general rule of thumb for brining is about 1 hour per pound of turkey, with 24 hours the maximum you should brine any bird. No matter how you flavor your brine, it's critical that the brine temperature is below 40 degrees Fahrenheit when you add the turkey, and throughout the entire brining process, so make sure to clear some room in your fridge.

If you want guaranteed great flavor, our Orange Brine & Turkey Rub Kit definitely won't disappoint. That kit is also included with our Turkey Blend hardwood pellets as well. If you opt to make your own brine, here are the three main ingredients that you’ll want to use:
Brine Liquid
Keeping your bird’s moisture content as high as possible before smoking, roasting or cooking is essential to a perfectly juicy outcome with these options:
- apple juice
- cider
- orange juice
- beer
- wine
- rice wine vinegar
- apple cider vinegar
- chicken stock
Use caution when adding liquids such as vinegar, wine, or soy sauce, as the acid or salt content can greatly affect the flavor profile, saltiness or texture of the finished product. Never replace all of the water in a recipe with these liquids; rather, think of them as an accent or additional flavoring. No matter which liquid you use, you'll want to make sure your turkey is fully submerged so that all of the meat will be flavorful. To plan ahead, a good rule of thumb is to use as much liquid by weight as you have meat. See our recipes below for quantities.
The type of liquid you choose should pair well with the overall flavor you’re craving.
- For a simple or classic savory flavor, stick with water, beer, or stock.
- To give a nice accent of sweetness, you can top off your brine with a few cups of vinegar, juice, maple syrup, or wine.
- Spirits always pair well with easy turkey brines. Our maple-brined turkey recipe calls for bourbon, and some Traeger reviewers have mentioned adding a cup of whiskey enhanced the flavor of our Traeger Brine Kit!
Brine Salt
Salt is the most essential part of any brine - wouldn't be a brine without it. Any salt will work here but keep in mind that not all salts are created equal. Table salt is a very small crystal, where sea salt or kosher salt are more coarse. Due to smaller crystals, 1 cup of table salt weighs more than 1 cup of kosher salt which means that your brine will be more concentrated if you use table vs. kosher. The different types of salt won't create much of a difference in the flavor profile but could change the salinity of your brine.
Turkeys absorb salt really well, so dissolving salt in your brining water achieves two key things – flavor and tenderization. Be aware though, that the longer the bird brines, the saltier it will be, so don't let it sit for too long. Just remember the basic rule of thumb, which is half cup of salt for every gallon of water, and one hour of brining time per pound of turkey. And don't forget to account for the extra salt when using other liquids such as stock.
Herbs and Spices
It's really easy to get creative with what you toss in, and hard to go wrong
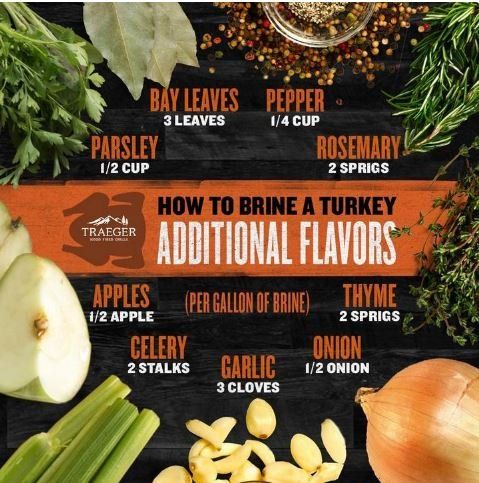
Poultry flavored with herbs, spices, and fruits are a match as old as time. You’ll want to make sure to add some of the following to your brine:
- rosemary
- peppercorns
- bay leaves
- garlic
- thyme
- apples
- brown sugar
- celery
- carrots
- parsley
- onions
- juniper berries
- orange/orange peel
- lemon/lemon peel
Tip from the Pro: "A typical brine for me would consist of rosemary, thyme, bay, peppercorn, garlic, brown sugar, orange, and lemon. - Nichole Dailey Chef de Cuisine at Traeger HQ.
The Secret to Golden Skin
While the turkey brine helps moisten the meat, the skin needs to be nice and dry in order to get that crispy finish.
- When you remove the bird from the brine, remember to let the cavity drain well. Rinse the bird and pat it dry. Dry skin = golden skin.
- Let it rest. If you have the time after letting it brine overnight in the fridge, you can also let it air dry in the fridge one more night. Place the bird on a baking sheet lined with a cooling rack so the bird is elevated and not sitting in liquid (remember: dry skin = golden skin) and let it air dry overnight. The skin will air out, while retaining the bird's internal moisture.
- Cooking the bird evenly is key. A pellet grill is ideal because you can control the temperature and it’s designed to circulate hot air – no need to worry about tying up the wings and thighs!
- For extra crispy skin, start cooking the bird covered in foil at a low temperature, and then take the foil off to cook at 375 degrees Fahrenheit.
- Whatever you do, make sure the meat is fully cooked. Due to carryover cooking, we recommend pulling your bird off the grill at 5-10 degrees F below the target finished temperature. As the bird rests the internal temperature will rise, level out, then begin to drop as it cools. When it levels out is where you want to hit your target temp. If you were to pull it at 165 degrees F exactly, it could rise as much as ten degrees during the rest resulting in a sad, overcooked bird. For a finished turkey it's best to aim for 165 degrees F in the breast and 175 in the thigh. Use caution when taking the internal temp to stay away from the bones as this will give you inaccurate reading.
- Let it rest. While your bird is cooking, the protein fibers tense up expelling moisture. Letting your bird rest prior to carving, allows all those juices to redistribute and make their way back into the protein fibers as they relax. Carving immediately after cooking just spills all those flavorful juices and hard work across your cutting board. We recommend at least 20-30 minute rest for the best results.
Whether you’re making a bare-bones brine or going for an all-out flavor assault, make sure you have everything you need before the big day arrives. We have the brine kit, rubs, tools and hardwood pellets you need to make a next-level turkey. You can also find out more about creating the ultimate Thanksgiving feast, including recipes and tips & tricks, here.

3 Turkey Brine Recipes
If you ever want to mix it up or reinvent Thanksgiving, try out some of the following variations.
Honey Roasted Whiskey Turkey Brine
Sugar is just one of many tools at your disposal. Toss in a cup of your favorite whiskey or bourbon along with 8 ounces of honey or maple syrup per gallon of water for a more robust sweet flavor. For a classic zest, pair that combination with some fresh garlic, sage, and bay leaves.
Teriyaki Whiskey Turkey Brine
You can also add your favorite fruit juice to sweeten the deal. It might be a sin to put pineapple on pizza, but who says you can’t pair it with turkey? Slice up some peaches, pineapple, fresh ginger, green onions, soy sauce, and rice vinegar for a teriyaki-style whiskey turkey brine. Instead of whiskey, you can also try a sweet bourbon or a dark rum.
Note: if you’re going heavy on the soy sauce, be sure to reduce how much salt you mix into the brine.
Sweet and Sour Easy Turkey Brine
Mix in a jar of apricot jam or preserves, some chopped onion, and a touch of honey or mirin for the sweet; plenty of wine, lemon juice, and/or vinegar for the sour. Give it some zest with grated citrus peel and a generous amount of fresh garlic and ginger.
Turn up the heat with your favorite fresh chopped peppers and chiles, but be mindful that the longer it brines, the hotter it gets.
Cooking Brined Turkey On a Pellet Grill
We believe the most special, impressive, and delicious way to cook a turkey is to use a pellet grill. Smoking turkey in a pellet grill not only gives you that wood-fired juicy flavor, but it's also a simple process that will give you more room for side dishes.
If you have a Traeger, you can grill, smoke, bake, roast, braise, and barbecue all your Thanksgiving favorites right in your backyard. Veggies and other roastables can be placed on the grill around the turkey and on upper grill grates. A Traeger works just like a convection oven, so you can bake pies on it too. Everything you make on a Traeger will be infused with incredible wood-fired flavor.
We have a complete guide on how to cook a Thanksgiving turkey to learn more about cooking times and temperatures. For smoking on a Traeger, Turkey by Rob Cooks suggests putting the turkey on the Traeger at 180 degrees Fahrenheit for two hours, 225 degrees for another hour, and then finish at 325 degrees.
Cooking Brined Turkey In the Oven
Roasting your Thanksgiving masterpiece in the oven is the most popular and conventional. But chances are turkey isn’t the only thing you’re cooking for the holidays, and it could use some good wood-fired flavor more than that sweet potato casserole.
For crispier skin, cover your turkey with foil and bake at 375 to 400 degrees Fahrenheit until the internal temperature reaches 155 degrees. Then uncover and cook at 450 degrees until the temperature clears about 160 when it’s time to take it out of the oven and let it rest.
Cooking times vary depending on the oven and size of the bird, but you can figure it will be about 15 minutes per pound roasting at 325 degrees Fahrenheit. When you take the temperature, make sure your thermometer is entering a thicker cut of meat, such as the breast.
Take a look at a few Traeger turkey recipes for the best inspiration and techniques — we recommend starting with our Traditional Thanksgiving Turkey, Herb-Roasted Turkey, or Ultimate Smoked Turkey.

Share Our Blog Post(s) However You'd Like!
Contact
Contact Us